

To check if your VPN is working, compare your public IP address with the VPN off and on, then run a DNS leak test and a WebRTC leak test while connected. If the VPN is working, the IP address, the DNS servers and any WebRTC addresses you see should all belong to the VPN provider, not to your internet service provider (ISP). Any sign of your real ISP means something is leaking.
A VPN app can show “Connected” while some traffic still goes around the tunnel. These three checks take a few minutes, need no technical skill, and are worth repeating after app updates, on new networks, and on each device you use.
Key takeaways
- IP check: with the VPN on, your public IP should change to one owned by the VPN provider.
- DNS leak check: the DNS servers shown should not belong to your real ISP.
- WebRTC check: your browser should not reveal your ISP’s public address.
- Test on every device and browser, because results can differ.
- Fix leaks in the VPN app’s settings first, then in the browser or operating system.
What a VPN leak test actually checks
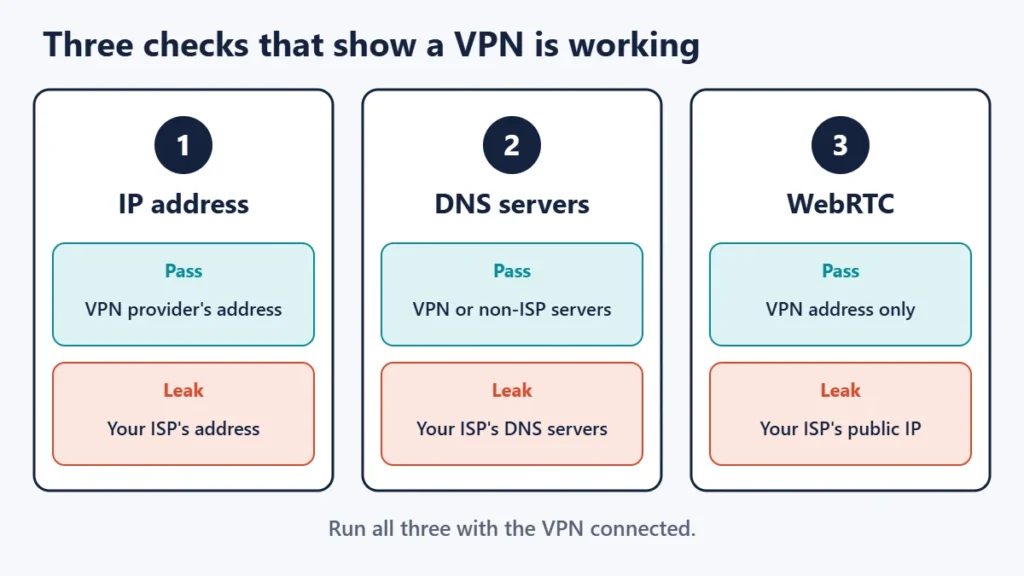
When a VPN is connected, websites should see the VPN server’s address rather than yours. But there are three separate routes by which your real connection can still show up:
| Check | What it looks at | Pass | Fail |
|---|---|---|---|
| IP address | The public address websites see | An address owned by the VPN provider | Your usual ISP address |
| DNS leak | Which servers translate website names into addresses | The VPN’s DNS servers, or another resolver that is not your ISP | Your ISP’s DNS servers |
| WebRTC leak | Addresses your browser can share for calls and video | Only the VPN address, or none | Your ISP’s public address |
Step 1: Check your IP address
- Disconnect the VPN and open an IP lookup page, or search for “what is my IP”. Note the address and the provider name it shows. This is your real ISP.
- Connect the VPN, wait a few seconds, then reload the page.
- Compare. The address should be different, and the provider shown should be the VPN company or the hosting company it uses, not your ISP. The location shown should roughly match the VPN server you chose.
If the address does not change, the VPN is not routing your traffic. Reconnect, try a different server, or reinstall the app. Many VPN apps also show the current address on their own screen, but an outside page is a better test because it sees what websites see.
Step 2: Run a DNS leak test
DNS is the system that turns a name like justwebworld.com into an IP address. Proton VPN’s support documentation notes that DNS servers are, by default, operated by your ISP. If those requests keep going to your ISP while the VPN is on, your ISP can still see which websites you look up. That is a DNS leak.
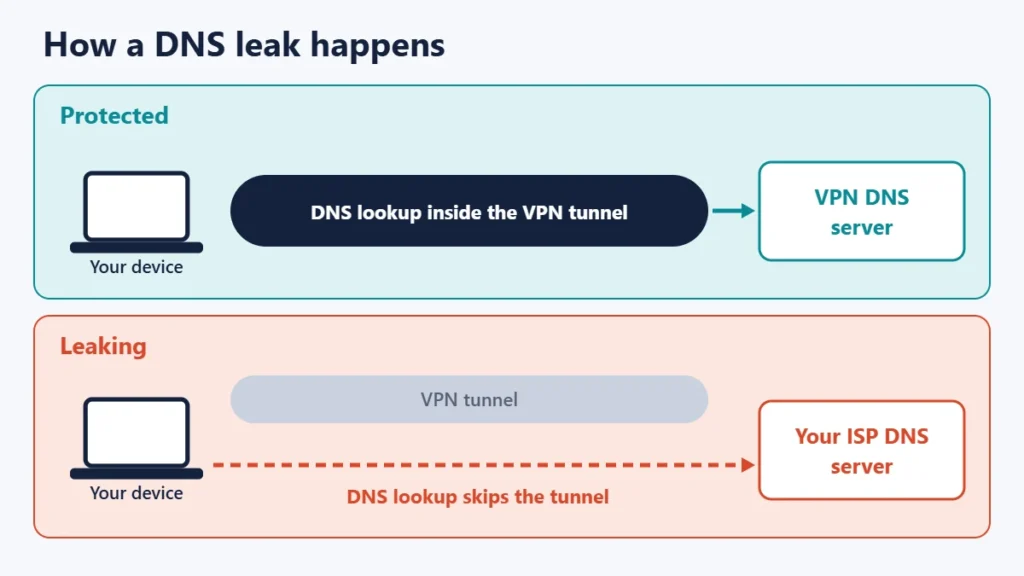
- With the VPN connected, open a DNS leak test page. Many VPN providers publish their own, and independent ones are also available.
- Run the extended test if one is offered. It sends several lookups and lists every DNS server that answered.
- Read the results. Mullvad’s help page puts it simply for its own service: a DNS leak means you are using a DNS server that does not belong to Mullvad. For any VPN, the key question is whether any server listed belongs to your real ISP.
Proton makes a useful point here: the servers shown may belong to a third-party company that the VPN uses, and that is not a leak. As long as the address does not belong to your real ISP, you do not have a DNS leak.
Step 3: Run a WebRTC leak test
WebRTC is the browser technology behind video calls and voice chat in web pages. To connect two people directly, it gathers network addresses. MDN Web Docs explains that a STUN server replies with the client’s public address. RFC 8828, the standard on WebRTC IP address handling, notes that when someone uses a VPN, WebRTC can discover not only the VPN’s public address but also the ISP public address over which the VPN is running.
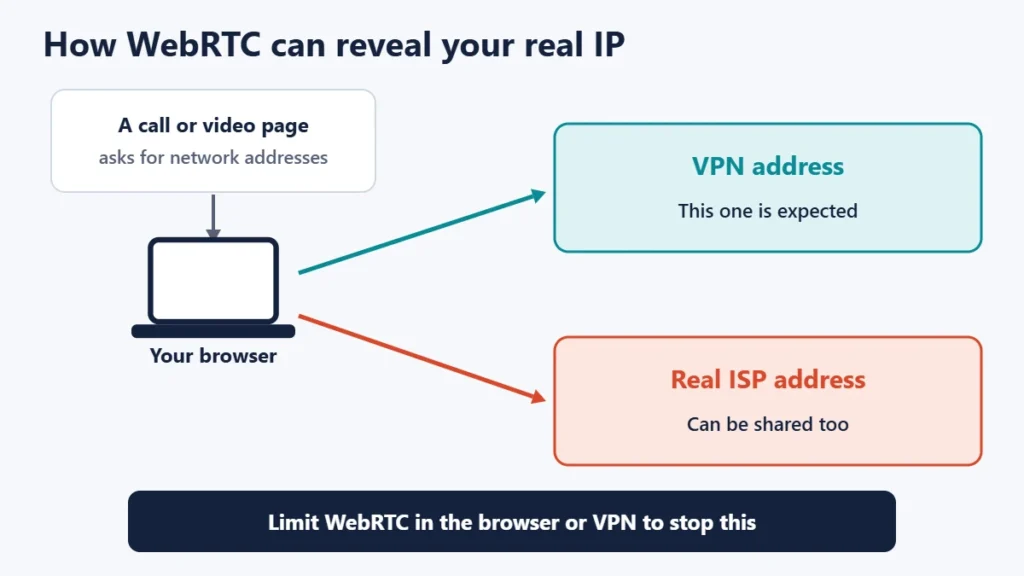
- With the VPN connected, open a WebRTC leak test page in each browser you use.
- Look at the public addresses listed. Your VPN address is fine. Your real ISP address is a leak.
- Private addresses, such as those beginning 192.168 or 10., refer to your home network. RFC 8828 notes these can be learned too. They do not reveal your location the way a public ISP address does, but some VPN apps and browser settings can hide them as well.
For background on the technology, see our explainer on what WebRTC is and its risks.
How to fix a leak
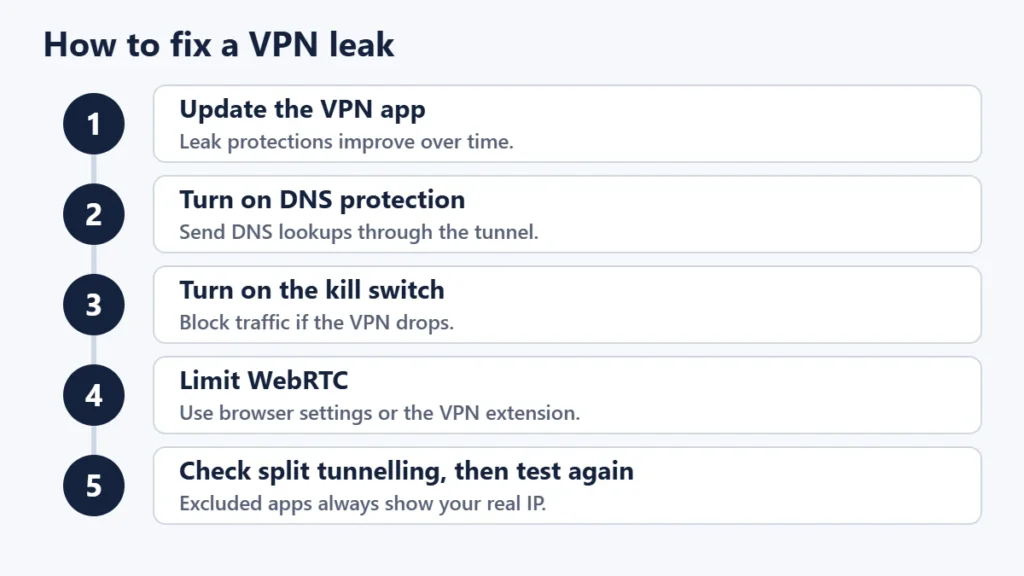
- Update the VPN app. Leak protections are improved over time.
- Turn on the app’s DNS protection. Most VPN apps have a setting that forces DNS through the tunnel or uses the provider’s own DNS servers. Check that a custom DNS setting is not overriding it.
- Turn on the kill switch. Proton describes its kill switch as blocking all internet traffic on your device until you are reconnected if the VPN connection is lost, which stops brief leaks during drops.
- Limit WebRTC. Some VPN browser extensions block WebRTC leaks. Some browsers also have privacy settings or add-ons that limit which addresses WebRTC can share. Test video calls afterwards, because strict settings can break them.
- Check split tunnelling. If you have excluded apps or websites from the VPN, traffic from those will show your real address by design. RFC 8828 notes the WebRTC issue applies to split-tunnel VPNs too.
- Check IPv6. Some VPN apps handle IPv6 by blocking it while connected, and Mullvad’s DNS page has advice for when an IPv6 DNS address appears. If a test shows an IPv6 address from your ISP, look for an IPv6 setting in the VPN app.
Then run all three tests again. If a leak remains, contact the VPN provider’s support team with the test results.
Test every device, browser and network
Leak protection depends on the app and the operating system, so one passing test does not cover everything. Check each phone, laptop and browser you use. Test again on public Wi-Fi, where a VPN matters most; our guide to using free Wi-Fi securely covers other precautions. On Android, Proton’s guide shows the system settings called Always-on VPN and Block connections without VPN, found in the VPN section of Network and internet settings.
What a leak test cannot tell you
- It cannot confirm a no-logs policy. A clean test shows your traffic goes through the VPN, not what the provider does with it.
- It does not prove you are anonymous. Accounts you sign in to, cookies and browser fingerprinting can still identify you.
- It shows a moment, not a guarantee. A leak can appear after an update, a network change or a dropped connection.
For a balanced view of what VPNs can and cannot do, see our guide to the pros and cons of using a VPN.
Common mistakes
- Testing only the IP address. DNS and WebRTC leaks can happen even when the IP check passes.
- Skipping the “VPN off” baseline. Without it, you cannot recognise your real ISP in the results.
- Testing one browser only. Each browser handles WebRTC differently.
- Treating a third-party DNS company as a leak. Only your real ISP’s servers indicate a leak.
- Forgetting split tunnelling exceptions. Excluded apps will always show your real address.
Frequently asked questions
How do I know if my VPN is working?
Your public IP address should change to one owned by the VPN provider when you connect, and DNS and WebRTC tests should not show your real ISP.
What is a DNS leak?
It is when your website lookups go to your ISP’s DNS servers instead of through the VPN, so your ISP can still see which sites you look up.
Is a WebRTC leak dangerous?
It can reveal your real public IP address to a website, which defeats one of the main reasons people use a VPN. It is usually fixed with browser or VPN settings.
Why does the location look wrong when the VPN is on?
IP location databases are approximate, so the city shown may differ from the server you chose. What matters is that the address belongs to the VPN, not your ISP.
Do I need to test on my phone too?
Yes. Each device and app can behave differently, so test each one.
How often should I run leak tests?
After installing or updating the VPN, after changing its settings, and when you use a new device or network.
The short version
A VPN is working when your IP address, DNS servers and WebRTC addresses all point to the VPN provider rather than your ISP. Run all three tests with the VPN on, compare with your baseline, and fix any leak through the app’s DNS protection, kill switch, browser WebRTC settings and split tunnelling choices. Then test again on every device you use.

Justwebworld has published guides since 2012. How we write and update articles Report an error
